Scheduled Windows App Launcher
with Telegram Remote Control
A free Windows tray tool that auto-launches your .exe / .bat / .cmd at scheduled times. Simpler than the Windows Task Scheduler — your first automation takes about 5 minutes. And 📱 a Telegram bot lets you remote-control your PC from your phone — check on a trading bot from the office, lock your home PC, grab a screenshot from anywhere.
Windows 10/11 (64-bit) · No runtime prerequisites · Start Menu shortcut included. Release repo
▶ Live Demo — run · search · history flow
Below is an interactive demo that reproduces the real app's user flow: highlight “Run now” → row pulse + balloon → search filter → history modal, looping automatically. A 30-second preview before you download.
Every schedule, one screen
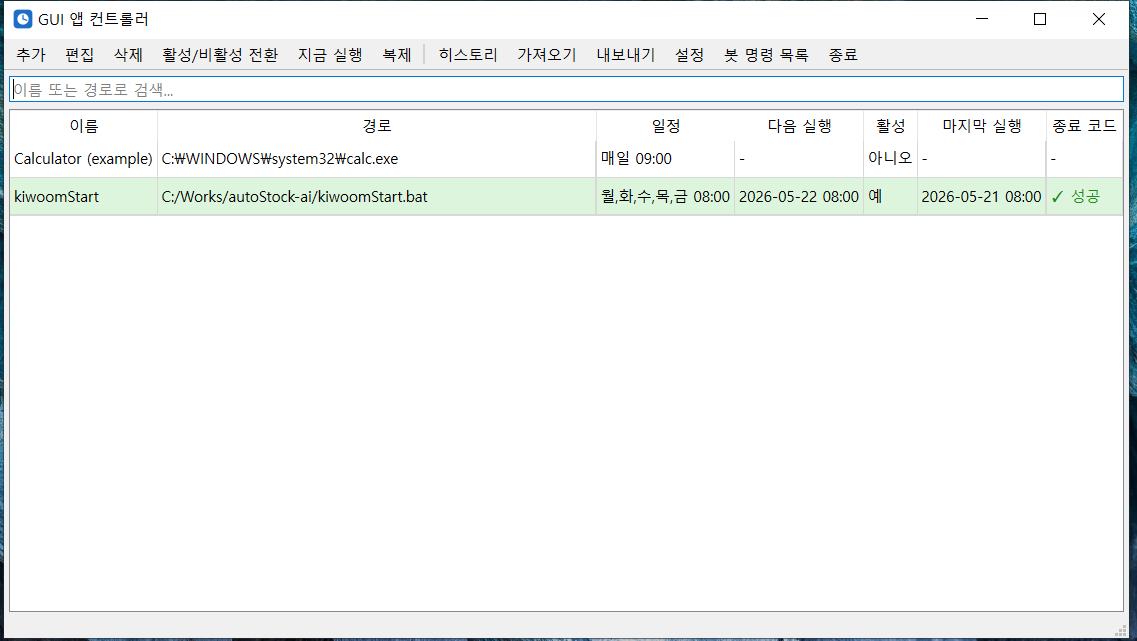
The screenshot is a real example. kiwoomStart.bat is configured to auto-run every Mon–Fri at 08:00, and the table shows today's 08:00 success and tomorrow's 08:00 next run at a glance.
Why this exists
Windows Task Scheduler is powerful but click-heavy. Just to set up “run this .bat every Monday morning” you walk through a four-step wizard — trigger, action, condition, settings — and editing later means diving back into the same maze.
GUI Apps Controller puts every schedule into one screen as a table. Adding, editing, or deleting is two clicks.
Who it's for
- Algorithmic / automated trading — fire up your HTS before market open, kick off data-collection scripts, start bots on schedule
- Developers — daily morning build / backup / log cleanup triggers
- Content / designers — start render or sync jobs at predictable times
- Everyone else — auto-launch a media player at movie time, auto-lock the PC at a scheduled hour, everyday automation
Download & install
Use the download button above or grab GuiAppsController-Setup-1.6.0.exe from the codingnow_release repo. Installers are hosted in the public codingnow_release repo.
- Windows 10 / 11 (64-bit)
- No Python or other runtime required
- Install → launch from Start Menu → tray icon shows up, done
Windows SmartScreen may warn on first launch (this is a self-signed free tool). Click More info → Run anywayand you're through.
Your first automation in 5 minutes
Following the screenshot, let's set up kiwoomStart to run a batch file every weekday at 08:00.
Step 1 — Click Add
Hit the toolbar's [Add] button or press Ctrl+N to open the edit dialog.
Step 2 — Fill in program info
- Name — a recognizable label (e.g. kiwoomStart)
- Path — [Browse] for an
.exe/.bat/.cmd - Arguments — command-line args if needed (optional)
- Working folder — leave blank to use the executable's folder
Step 3 — Pick a schedule
- Daily — same time every day (e.g. 09:00)
- Weekly — pick days (Mon–Fri only = weekday-only automation)
- Once — single execution at a specific datetime (release reminders, etc.)
Step 4 — Save
Press [OK]and the entry shows up in the table. The “Next run” column displays the actual next execution time computed by APScheduler, so you can verify the schedule matches your intent at a glance.
Step 5 — Verify
Select the new row and press [Run now] (Ctrl+R) to fire it immediately, regardless of the schedule. The fastest way to confirm “does my .bat actually run cleanly?”
💡 Active rows highlight in light green in the table, and expired one-shot schedules turn light red. You can see at a glance which schedules are live.
📱 Telegram bot — control your PC from your phone
The headline feature added in v1.5.x. Connect a Telegram bot once and you can drive your PC from anywhere — check whether your home trading bot is still running from the office, lock your PC remotely, grab a screenshot, or trigger a registered program instantly.
Step 1 — Create a bot with BotFather and copy the token
- Search
@BotFatherin Telegram → open the chat →/start - Send
/newbot - Enter the bot display name (e.g.
My PC Controller) — this is what users see - Enter the bot username (e.g.
my_pc_controller_bot) — must end withbot - Copy the token from BotFather's reply — looks like
123456789:ABC-DEF1234ghIkl-zyx57W2v1u123ew11
bot.Use this token to access the HTTP API:
123456789:ABC-DEF1234ghIkl-zyx57W2v1u123ew11Keep your token secure and store it safely, it can be used by anyone to control your bot.
↑ The actual BotFather conversation flow (re-created). Copy the token from the last message.
⚠ Treat the token like a password. Anyone with it can control the bot. Never commit it to GitHub, paste it in screenshots, or share it in blog posts. If it leaks, run /revoke in BotFather to regenerate.
Step 2 — Get your Chat ID (two ways)
Method ① Use @userinfobot (simplest)
- Search
userinfobotin Telegram → in the results, pick “User Info • Get ID • IDbot” (blue ✔ verified badge · 500K+ users). Other look-alikes such as@UserInfo_Botare impersonators and won't respond. - Open the chat and send
/startor any message — it replies with your ID, e.g.Id: 123456789 - That number is your chat_id
First: John
Username: @john_doe
Language: en
↑ The number on the Id line (123456789) is your chat_id.
Method ② Query getUpdates directly (precise)
- Send any message to the bot you created in Step 1 (
/startworks) - Open this URL in your browser (replace
<TOKEN>with the token from Step 1):https://api.telegram.org/bot<TOKEN>/getUpdates
- In the JSON response, the number inside
"chat":{"id":123456789}is your chat_id - If the response is empty (
{"ok":true,"result":[]}) — send a message to the bot first, then call again
{
  "ok": true,
  "result": [
    {
      "update_id": 100000001,
      "message": {
        "message_id": 1,
        "from": { "id": 123456789, "first_name": "John" },
        "chat": { "id": 123456789, "type": "private" },
        "date": 1715000000,
        "text": "/start"
      }
    }
  ]
}
↑ The number inside chat.id is your chat_id.
💡 For group chats: add the bot to the group, send a message in the group, then call getUpdates — the group's chat.id will be negative (e.g. -123456789).
Step 3 — Register in the app
In GUI Apps Controller: Settings → Telegram tab:
- Bot Token — the token from Step 1
- Chat ID — the number from Step 2 (acts as a whitelist — only registered chat_ids can issue commands)
- Enable and save
After saving, send /list to the bot from Telegram. If you get a list of registered programs back, the integration is live.
Available commands
/list— show registered programs/run <name>— remote launch/screenshot— receive a PC screen capture on your phone/lock,/shutdown,/restart— lock / shut down / restart/history— recent execution log
🔒 Security: the chat_id whitelist means that even if someone knows your bot's username, their commands are dropped silently. Only registered chat_ids are honored. If the token itself ever leaks, regenerate via BotFather — never paste tokens into GitHub, blog posts, or screenshots.
Daily-use tips
Search to jump fast
Type any part of a name or path into the search box above the table and the list filters instantly. Stays comfortable even with 30+ registered programs.
Multi-select + bulk operations
Ctrl+click / Shift+click multiple rows, then:
- Enable / disable toggle — pause everything during a vacation
- Delete — clean up stale entries in one go
- Duplicate (
Ctrl+D) — save time when creating similar entries
History (Ctrl+H)
“Did it actually run at 3am yesterday?” — the history window answers. The last 500 launch / exit / failure events are persisted. Exit-code color coding (green = success, red = failure) makes anomalies pop out immediately.
Import / export
[Export] writes a JSON file you can carry to another PC and [Import] there to restore all schedules in one shot. Handy for PC migration or syncing home/office machines.
Survives sleep
Close your laptop, open it again later — schedules still work. The app listens for Windows sleep / resume events and the scheduler recomputes automatically. No more “APScheduler missed the next run after suspend” gotchas.
Dark mode
Switch your system theme to dark and the table background and accent colors flip to a dark palette automatically.
FAQ
Q. My program didn't run. Can I tell why?
All launch / exit events are written to %APPDATA%\GuiAppsController\logs\app.log. A rotating handler (2 MB × 5 files) keeps it from filling your disk. The History window shows the same data in a GUI.
Q. What if the PC was off at that scheduled time?
Schedules that hit while the PC was off are skipped (APScheduler default behavior). The next scheduled run proceeds normally.
Q. A one-shot schedule's time already passed.
It's marked “(expired)” in the table with a light red background. Edit it to a future datetime and save — it's re-armed.
Q. Can it launch on Windows startup?
Tick “Run on Windows startup” in Settings. It registers under HKCU\...\Run so no admin rights needed.
Q. Can concurrent saves corrupt my settings?
From v1.0.3 every save goes through fsync + atomic replace + JSON pre-validation, so even a sudden power cut won't leave config.json corrupted. If it ever does, the app auto-recovers from the .bak file.
❤️ Free · No ads
A small tool that makes a tedious thing simple. If there's anything you do by hand every day, try registering it. Five minutes is genuinely enough for the first one.
Found this useful? ❤️ Support the maker
Any amount helps. Sent directly with no ad or processing fees.